Occasionally we need to use custom html to obtain the layouts shown on our demos in specific modules. The code below is what was used on this template. It is best to enter this code directly into the HTML editor function of your editor.
Image and Content Fader Code:
There are three different style slides to use. Each style is shown on the homepage of this demo. The first style aligns the text on the left and an image in the bottom right corner. The second style is the easiest to use, it aligns all text in the middle and uses no images. The third style is similar to the first, but it aligns the image in the center rather than the bottom right corner.
For setup instructions of this extension please visit
http://www.shape5.com/documentation/Joomla/Extensions/S5-Image-and-Content-Fader 
Code used for text area, the title setting should be turned off in the settings. All text is entered in the text field settings. You can also use this same code in any article if you are using the article method of the module: Style 1:
<span class="text_and_bottom_image">
<span class="left">
<span class="slide_small_title">
We Are Your Customer Support Experts.
</span>
<span class="slide_title">
Happy Clients. Happy You.
</span>
<br />
<a class="readon" href="index.php/features-mainmenu-47/template-specific-features">Read
More</a>
<a class="readon readon_white" href="index.php/features-mainmenu-47/template-specific-features">See Features</a>
</span>
<span class="right">
<img alt="" src="images/iacf1_pic.png" />
</span>
</span>
Style 2:
<span class="center">
<span class="slide_small_title">
Now with automatic article integration features.
</span>
<span class="slide_title">
V4 Image and Content Fader
</span>
<br />
<a style="float:none" class="readon" href="index.php/extensions/s5-image-and-content-fader">Read More</a>
<a style="float:none" class="readon readon_white" href="index.php/extensions/s5-image-and-content-fader">See
Features</a>
</span>
Style 3:
<span class="text_and_image">
<span class="left">
<span class="slide_small_title">
Vertex Has The Tools To Build Your Site Right.
</span>
<span class="slide_title">
Your Site On Any Device.
</span>
<br />
<a class="readon" href="index.php/features-mainmenu-47/template-features/responsive-layout">Read
More</a>
<a class="readon readon_white" href="index.php/features-mainmenu-47/template-features/responsive-layout">See Features</a>
</span>
<span class="right">
<img alt="" src="images/iacf2_pic.png" />
</span>
</span>
Top Boxes and Text:
This area is created with two custom html modules. One is published to the custom_2 position and the other published to the custom_3 position.
Code used for the custom_2 area. The image shown in the two boxes is a background image, so not all of the image is intended to show at all resolutions. You simply change out the background call with your own image source in the code below:
Custom_2:
<div class="top_boxes_wrap_outer">
<div class="top_boxes_wrap">
<div style="background: url('/images/custom2.jpg');" class="top_boxes_left">
</div>
<div class="top_boxes_right">
<h3><strong>Meet</strong> With One Of Our Professional Consultants</h3>
<span>Lorem ipsum dolor sit amet, consectetur adipiscing elit. Integer et laoreet. Quis pharetra odio nunc.</span>
<br>
<a href="/" class="readon readon_highlight2">Contact Us</a>
</div>
</div>
</div>
Code used for the custom_3 area. This module uses the class suffix "larger_title" and "s5_icon.ion-ios-chatbubble":
Interdum et malesuada fames ac ante ipsum primis in faucibus. Aliquam eget massa mattis, dignissim mi id, lorem ipsum in elate soun facilisis purus. In elit justo, efficitur quis.
1257 Moyer Road / Littletown, AR 19872 / USA 1.800.555.1212
Top Image Boxes:
This is a custom html module that is published to the top_row1_1 position, but can be published to almost any row of positions.
Code used for this area:
<div class="image_boxes_wrap">
<div class="image_boxes_wrap_inner">
<div class="image_boxes_row">
<div class="image_box_item">
<div class="image_box_item_inner1">
<div class="image_box_item_inner2" style="min-height: 499px;">
<a href="index.php/features-mainmenu-47/template-features/responsive-layout">
<div class="image_box_image">
<div class="image_box_image_inner">
<img src="images/top1.jpg" alt="">
<i class="image_box_icon ion-link"></i>
</div>
</div>
</a>
<div class="image_box_text">
<h3>Responsive</h3>
<br>
<span>You can easily adapt your site to any screen size or device. Simply resize your screen to see it all in action.</span>
<br>
<a class="readon" href="index.php/features-mainmenu-47/template-features/responsive-layout">Read More</a>
</div>
</div>
</div>
<div style="clear:both:height:0px;"></div>
</div>
<div class="image_box_item">
<div class="image_box_item_inner1">
<div class="image_box_item_inner2" style="min-height: 499px;">
<a href="index.php/features-mainmenu-47/template-specific-features">
<div class="image_box_image">
<div class="image_box_image_inner">
<img src="images/top2.jpg" alt="">
<i class="image_box_icon ion-link"></i>
</div>
</div>
</a>
<div class="image_box_text">
<h3>Flexible</h3>
<br>
<span>This design comes with options like multiple menus, highlight colors, Google Fonts, dozens of positions, and more.</span>
<br>
<a class="readon" href="index.php/features-mainmenu-47/template-specific-features">Read More</a>
</div>
</div>
</div>
<div style="clear:both:height:0px;"></div>
</div>
<div style="clear:both:height:0px;"></div>
</div>
<div class="image_boxes_row">
<div class="image_box_item">
<div class="image_box_item_inner1">
<div class="image_box_item_inner2" style="min-height: 499px;">
<a href="index.php/extensions/s5-image-and-content-fader">
<div class="image_box_image">
<div class="image_box_image_inner">
<img src="images/top3.jpg" alt="">
<i class="image_box_icon ion-link"></i>
</div>
</div>
</a>
<div class="image_box_text">
<h3>Extensions</h3>
<br>
<span>This month we also are launching the new Image and Content Fader V4, now with an article integration method.</span>
<br>
<a class="readon" href="index.php/extensions/s5-image-and-content-fader">Read More</a>
</div>
</div>
</div>
<div style="clear:both:height:0px;"></div>
</div>
<div class="image_box_item">
<div class="image_box_item_inner1">
<div class="image_box_item_inner2" style="min-height: 499px;">
<a href="index.php/features-mainmenu-47/template-specific-features">
<div class="image_box_image">
<div class="image_box_image_inner">
<img src="images/top4.jpg" alt="">
<i class="image_box_icon ion-link"></i>
</div>
</div>
</a>
<div class="image_box_text">
<h3>Technology</h3>
<br>
<span>This design is built on the powerful Vertex4 template framework, which makes setting up your site quick and easy!</span>
<br>
<a class="readon" href="index.php/features-mainmenu-47/template-specific-features">Read More</a>
</div>
</div>
</div>
<div style="clear:both:height:0px;"></div>
</div>
<div style="clear:both:height:0px;"></div>
</div>
<div style="clear:both:height:0px;"></div>
</div>
</div>
Learn More About Us:
This is a custom html module that is published to the top_row2_1 position, but can be published to almost any row of positions.
Code used for this area. The image shown on the left side is a background image, so not all of the image is intended to show at all resolutions. You simply change out the background call with your own image source in the code below:
<div class="learn_about_us_wrap">
<div style="background: url('/images/learn.jpg');" class="learn_about_us_img_wrap"></div>
<div class="learn_about_us_text_wrap">
<div class="learn_about_us_text_wrap_inner">
<h3>Learn More About Us</h3>
<span class="learn_about_us_title_sub">Let us help you make you make your
business a success</span>
Lorem ipsum dolor sit amet, consectetur adipiscing elit. Integer ut pellentesque velit, a dictum tortor. Donec euismod posuere diam, at imperdiet felis rhoncus at. Donec vitae ante odio. Nullam vel solliin mi. Proin ante magna, interdum lacinia interdum in, tristique pulvinar purus.
<ul>
<li><i class="ion-checkmark"></i>Lorem ipsum dolor sit amet</li>
<li><i class="ion-checkmark"></i>Consectur adipiscing elit</li>
<li><i class="ion-checkmark"></i>Integer molestie lorem at</li>
<li><i class="ion-checkmark"></i>Facilisis in pretium nisl aliquet</li>
<li><i class="ion-checkmark"></i>Nulla volutpat aliquam velit</li>
<li><i class="ion-checkmark"></i>Vesti dignissim eget lectus</li>
<li><i class="ion-checkmark"></i>Sed condimentum justo</li>
<li><i class="ion-checkmark"></i>Aenean imperdiet dictum nibh</li>
<li><i class="ion-checkmark"></i>Proin ultricies arcu metus</li>
<li><i class="ion-checkmark"></i>Quisque mattis arcu nisl</li>
</ul>
<br><br>
</div>
</div>
<div style="clear:both;height:0px;"></div>
</div>
Centered Text:
This code is published to a custom html module and is used in various positions.
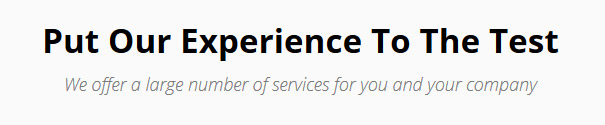
Code used for this area:
<div class="centered_text">
<h3>Put Our Experience To The Test</h3>
<span>We offer a large number of services for you and your company</span>
</div>
Center Text and Graphs:
The text area is simply an article that is published to Featured. The graphs are custom html modules that are published to the middle_bottom_1 and middle_bottom_2 positions. Scroll Reveal must be enabled under the Javascripts tab in the template configuration.

Code used for the graphs:
<div class="progress_bar">Customer Service <strong>95%</strong>
<div class="progress_bar1">
<div style="width:95%;" class="progress_bar2"></div>
</div>
</div>
<div class="progress_bar">Business Satisfaction <strong>75%</strong>
<div class="progress_bar1">
<div style="width:75%;" class="progress_bar2"></div>
</div>
</div>
<div class="progress_bar">Overall Rating <strong>85%</strong>
<div class="progress_bar1">
<div style="width:85%;" class="progress_bar2"></div>
</div>
</div>
Vertical Accordion:
Each slide in the S5 Vertical Accordion is a custom html module that is published to the s5_va_X positions. Each module becomes a slide. Below is the code used for the first accordion, the image is intended to disappear on smaller resolutions to save space.
For setup instructions of this extensions please visit
http://www.shape5.com/documentation/Joomla/Extensions/S5-Vertical-Accordion 
Code used for the first accordion:
<img alt="" src="/images/accordion1.jpg" class="accordion_image">
<h5>Find The Best Clients</h5>
Lorem ipsum dolor sit amet, consect etur adipiscing elit. Nullam molestie mi a nunc porta facilisis. Mauris varius volutpat interdum. In quis congue velit, orci.
<br>
<a href="/index.php/features-mainmenu-47/template-specific-features" class="readon">Read More</a>
<div style="clear:both;height:0px;"></div>
Stats Area:
This is a custom html module that is published to the below_columns_1 position, but can be published to various positions.
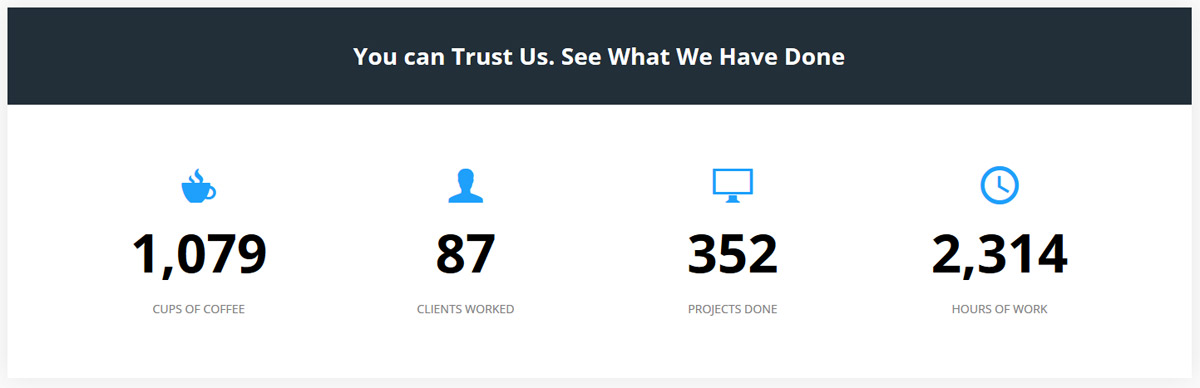
Code used for this area:
<div class="stats_row">
<div class="stats_row_title">
<h3>You can Trust Us. See What We Have Done</h3>
</div>
<div class="stats_1 stats_item"
<span class="ion-coffee stats_icon"></span>
<span class="stats_number">1,079</span>
<span class="stats_text">Cups of Coffee</span>
</div>
<div class="stats_2 stats_item"
<span class="ion-person stats_icon"></span>
<span class="stats_number">87</span>
<span class="stats_text">Clients Worked</span>
</div>
<div class="stats_3 stats_item"
<span class="ion-monitor stats_icon"></span>
<span class="stats_number">352</span>
<span class="stats_text">Projects Done</span>
</div>
<div class="stats_4 stats_item"
<span class="ion-android-time stats_icon"></span>
<span class="stats_number">2,314</span>
<span class="stats_text">Hours of Work</span>
</div>
<div style="clear:both;height:0px;"></div>
</div>
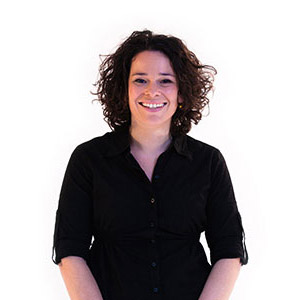
Testimonial Area:
This area consists of two positions. The first is a custom html module that shows the image of three people, this is published to the bottom_row1_1 position. The other is the S5 Tab Show that is published to the bottom_row1_2 position. The background of this area can be controlled from the Main / Layout page in the template configuration.
For setup instructions of this extension please visit
http://www.shape5.com/documentation/Joomla/Extensions/S5-Tab-Show 
Code used in bottom_row1_1:
<img alt="" src="/images/testimonials.png" class="testimonials_img" />
Code used in the S5 Tab Show slides:
<div class="testimonial">
<span class="testimonial_text">
“Lorem ipsum dolor sit amet, consectetur adipiscing elit. Maecenas facilisis, velit ut tincidunt laoreet, nunc orci tristique est, at placerat ligula urna et neque. Sed sed mattis nibh. Sed venenatis tortor metus, vel volutpat mauris.”
</span>
<div class="testimonial_details">
<img alt="" src="/images/testimonial1.jpg">
<span class="testimonial_name">George <span class="highlight1">Hatfield</span></span>
<span class="testimonial_title">CEO of Right Fods Inc.</span>
<div style="clear:both;height:0px;"></div>
</div>
</div>
Pre-Text defined in the S5 Tab Show settings:
<div class="testimonials_text">
<h3>Customer Testimonials</h3>
<span>Hear what our customers have to say about us</span>
</div>
Team Section:
Each of these is a custom html module that is published to the bottom_row2_1 and bottom_row2_2 positions. The employee boxes use the class suffix "shadow", the text box uses no class suffix.
Code used for employee:
<div class="employee" style="min-height: 133px;">
<img alt="" src="/images/employee1.jpg" class="employee_image">
<span class="employee_name">Alex Smith</span>
<span class="employee_title">CEO of Businessline Inc.</span>
<span class="employee_text">Lorem ipsum dolor sit amet, consectetur adipiscing elit. Maecenas facilisis, velit ut tincidunt laoreet, nunc orci tristique est, at placerat.</span>
<div style="clear:both;height:0px;"></div>
</div>
Code used for text:
<div class="employee meet_team" style="min-height: 133px;">
<div class="large_title_text">
<h3>Meet Our Team</h3>
<span>Our company is built with experience, friendliness and proficiency</span>
</div>
</div>
Bottom Boxes:
This is a custom html module that is published to the custom_4 position.
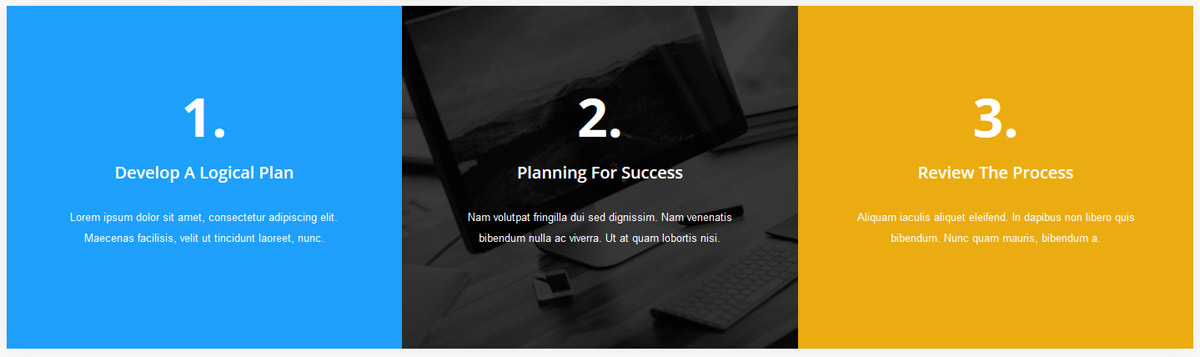
Code used for this area:
<div class="steps_boxes"
<div class="steps_boxes_item steps_boxes_highlight1">
<span class="steps_boxes_number">1.</span>
<span class="steps_boxes_title">Develop A Logical Plan</span>
Lorem ipsum dolor sit amet, consectetur adipiscing elit. Maecenas facilisis,
velit ut tincidunt laoreet, nunc.
</div>
<div class="steps_boxes_item steps_boxes_picture">
<span class="steps_boxes_number">2.</span>
<span class="steps_boxes_title">Planning For Success</span>
Nam volutpat fringilla dui sed dignissim. Nam venenatis bibendum nulla ac
viverra. Ut at quam lobortis nisi.
</div>
<div class="steps_boxes_item steps_boxes_highlight2">
<span class="steps_boxes_number">3.</span>
<span class="steps_boxes_title">Review The Process</span>
Aliquam iaculis aliquet eleifend. In dapibus non libero quis bibendum. Nunc quam
mauris, bibendum a.
</div>
<div style="clear:both;height:0px;"></div>
</div>
Bottom Address:
This is a custom html module that is published to the custom_5 position.

Code used for this area:
<div class="bottom_address">
<h3>Businessline Inc.</h3>
<span class="address_info"><i class="ion-ios-location"></i>1257 Moyer Road / Littletown, AR 19872 / USA</span>
<span class="address_info"><i class="ion-ios-telephone"></i>1.800.555.1212</span>
</div>
Social Icons:
This is a custom html module that is published to the custom_6 position.
Code used for this area:
<a class="social_icon ion-social-facebook"></a>
<a class="social_icon ion-social-twitter"></a>
<a class="social_icon ion-social-googleplus"></a>
<a class="social_icon ion-social-pinterest"></a>
<a class="social_icon ion-social-rss"></a>